Layering: Pigment Gradient
I've been in a little bit of a rut with my manicures lately. So, I've been pinning, hearting, liking, and tumbling like crazy... searching for inspiration and fresh ideas. I came across this pin... which I'd already pinned a year ago. I even bought the pigment, but never tried it out, until last night. Hey, Pinterest was made for those of us reside in Procrastination Station... :)
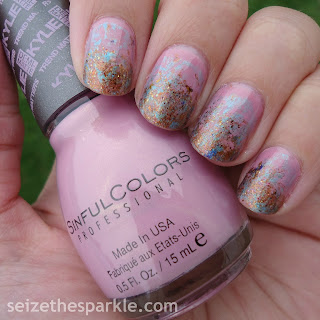
I could've replicated this look exactly, but instead opted to use a different color polish. If I had to name this layering, it'd be Jade Arcade all the way, even thought the base polish is OPI Don't Mess with OPI NOT OPI Jade is the New Black. Confused yet? Look at the pretty pictures... shiiiiiiny...
I really love the way this layering turned out. Originally, I thought about using Elsbeth's Rose from Orly to duplicate the look in the tutorial. Then, I remembered that I own Don't Mess with OPI, which I've never worn before, AND a pot of Penny Arcade which was still shrink-wrapped! Seriously, these two were made for each other!
Polishes Materials Used:
1 Coat Beauty Secrets Ridge Filler
3 Coats OPI Don't Mess with OPI
Jessie's Girl Pure Pigment Eye Dusts in Penny Arcade
Eyeliner Brush
2 Coat Color Club Top Coat
1 Coat Essie Good to Go
Getting this look is actually super simple. It's even easier than using glitter polish to create a gradient. I used a double ended flat eyeliner/smudge brush for my manicure, but I'm sure you could use any small brush or an eyeshadow applicator.
After my 2nd coat of Don't Mess with OPI, I got my pigment ready. Nail by nail, I added the 3rd coat of Don't Mess with OPI, dipped my brush sparingly in the pigment jar, and tapped pigment onto my wet nail, blowing the pigment towards the tip of my nail. I went back and repeated the process over a few nails a second and third time to make sure I had a varied look. When I was happy with the look, I dabbed pigment over my cuticles for a more defined gradient look. 2 coats of clear and a coat of Essie Good to Go sealed in this layering and made it SUPER shiny.
I was actually surprised to find that when I put on my first coat of clear, the pigment didn't really budge. I thought it might create more of a streaky look like in the tutorial photos, but I actually like that it didn't. And color-wise, the copper really pops against Don't Mess with OPI.
Don't Mess with OPI is a slightly muddied and yellowed jade. I don't own Jade is the New Black, but comparisons of the 2 show that Don't Mess with OPI leans slightly more yellow... and I do mean slightly. Penny Arcade is a metallic copper pigment dust.
Why pigment? Couldn't you get the same look with eyeshadow? Yes and no.
Penny Arcade is a pigment. Loose, metallic, copper-colored powder that's incredibly vibrant. Eyeshadow is usually pressed and not as vibrant, but that's not always the case. You can use eyeshadow and achieve a similar look to this layering, but the results probably won't be as striking as they would with pigment*. Also, the pigment I used and the pigment in the tutorial had a metallic finish. You may experience different results with a non-metallic finish.
This layering has fed my desire to:
A. Buy more pigments. All. Of. The. Pigments.
B. Experiment with regular eyeshadow.
C. Actually try more pins in the future.
D. All of the Above.
P.S. Happy Friday!
*I don't know this for sure, but I do plan on finding out. Eventually. Patience, grasshopper.
 |
| image & technique c/o Makeup Savvy |
I could've replicated this look exactly, but instead opted to use a different color polish. If I had to name this layering, it'd be Jade Arcade all the way, even thought the base polish is OPI Don't Mess with OPI NOT OPI Jade is the New Black. Confused yet? Look at the pretty pictures... shiiiiiiny...
 |
| Pigment Gradient - Artificial Light |
 |
| Pigment Gradient - Artificial Light |
 |
| Penny Arcade dusted over Don't Mess with OPI - Artificial Light |
 |
| Pigment Gradient Layering - Artificial Light |
 |
| MACRO |
I really love the way this layering turned out. Originally, I thought about using Elsbeth's Rose from Orly to duplicate the look in the tutorial. Then, I remembered that I own Don't Mess with OPI, which I've never worn before, AND a pot of Penny Arcade which was still shrink-wrapped! Seriously, these two were made for each other!
1 Coat Beauty Secrets Ridge Filler
3 Coats OPI Don't Mess with OPI
Jessie's Girl Pure Pigment Eye Dusts in Penny Arcade
Eyeliner Brush
2 Coat Color Club Top Coat
1 Coat Essie Good to Go
Getting this look is actually super simple. It's even easier than using glitter polish to create a gradient. I used a double ended flat eyeliner/smudge brush for my manicure, but I'm sure you could use any small brush or an eyeshadow applicator.
After my 2nd coat of Don't Mess with OPI, I got my pigment ready. Nail by nail, I added the 3rd coat of Don't Mess with OPI, dipped my brush sparingly in the pigment jar, and tapped pigment onto my wet nail, blowing the pigment towards the tip of my nail. I went back and repeated the process over a few nails a second and third time to make sure I had a varied look. When I was happy with the look, I dabbed pigment over my cuticles for a more defined gradient look. 2 coats of clear and a coat of Essie Good to Go sealed in this layering and made it SUPER shiny.
I was actually surprised to find that when I put on my first coat of clear, the pigment didn't really budge. I thought it might create more of a streaky look like in the tutorial photos, but I actually like that it didn't. And color-wise, the copper really pops against Don't Mess with OPI.
Don't Mess with OPI is a slightly muddied and yellowed jade. I don't own Jade is the New Black, but comparisons of the 2 show that Don't Mess with OPI leans slightly more yellow... and I do mean slightly. Penny Arcade is a metallic copper pigment dust.
Why pigment? Couldn't you get the same look with eyeshadow? Yes and no.
Penny Arcade is a pigment. Loose, metallic, copper-colored powder that's incredibly vibrant. Eyeshadow is usually pressed and not as vibrant, but that's not always the case. You can use eyeshadow and achieve a similar look to this layering, but the results probably won't be as striking as they would with pigment*. Also, the pigment I used and the pigment in the tutorial had a metallic finish. You may experience different results with a non-metallic finish.
This layering has fed my desire to:
A. Buy more pigments. All. Of. The. Pigments.
B. Experiment with regular eyeshadow.
C. Actually try more pins in the future.
D. All of the Above.
P.S. Happy Friday!
*I don't know this for sure, but I do plan on finding out. Eventually. Patience, grasshopper.

Comments
Post a Comment