Nail Art: Star Sticker Manicure (Staricure) TUTORIAL
If you're familiar with DIY manicures... I'm sure you've seen half-moon manicures made using reinforcement stickers. Instead of reinforcements, I used foil star stickers for a unique and different shape. This is my first official foray into Nail Art AND my first tutorial. Enjoy!
Materials Needed
Foil Star Stickers like these
Nail Polish
Tweezers
Step 1
Paint your nails. I cheated a bit and used the polish I was already wearing as my base. Why? I've tried the half-moon thing in the past, and every time I try it all at one go, I end up pulling off base coat. This was a stress-free way to be sure that my base coat was dry. Here are the layers for my base:
2 Coats Beauty Secrets Ridge Filler
3 Coats Bongo Catching Kisses
1 Coat Borghese Clear Coat
1 Coat Seche Vite
Step 2
Anchor one point of the star on your skin, and firmly press the star onto your nail. The point anchored on your skin will make for easy removal with tweezers once you're finished painting. Double-check your stickers for any gaps. If your stickers aren't firmly attached to the nail, your lines (and polish) may blur.
Step 3
Paint your nails! (again.)
Polishes Used:
Base Polish (see above)
3 Coats OPI Bubble Bath (star outline)
2 Coats L'Oreal Lilac Coolers (star outline)
1 Coat Nails Inc. Old Vic
1 Coat Borghese Clear Coat
1 Coat Seche Vite
Is it really that simple? Yes and No. Like I said above, I highly recommend starting with day-old polish on your nails. It takes a lot of waiting time and stress away from the manicure. Part of my problem with any type of stencil manicure is that I'm horrible at judging when my nails are fully dry. That's why I paint my nails right before I go to bed. A coat of Seche Vite or Good to Go sets them up nicely that I can't ding them, and I wake up with perfectly dried nails 97% of the time*.
I don't recommend using 5 coats on top of the stickers. I think I would max out at 2 or 3 next time. I had a pretty clear idea of the look I wanted, and it called for a lighter shade over a darker one. To achieve that, I had to use Bubble Bath to bring Catching Kisses down to a point where I could layer something over it and have it turn the shade I wanted.
I took my time on this manicure, and it shows. And not in the greatest of ways. My stars have a bit of an edge to the outline because the polish started drying before I removed the stickers. I was going to pass on the layer of clear polish after Old Vic, but I was hoping it would help smooth off this edge. It smoothed it out well enough, but I was envisioning a more seamless look. I think that will come with a few more attempts.
I'm really happy with how this manicure turned out. It may not look exactly how I imagined, but it's a fun and simple way to amp up your nails. I kept my star stickers uniform, but next time, I might switch them around from nail to nail, or just use a couple for accent nails.
Which do you prefer... A half-moon manicure, or a star manicure... Or are they both out of this world?!? (I'm cheesy and I know it.)
* 3% of the time, I'm a ninja in my sleep and I wake up with a dent or smudge. It's pretty rare, but it has happened.

Materials Needed
Foil Star Stickers like these
Nail Polish
Tweezers
Step 1
Paint your nails. I cheated a bit and used the polish I was already wearing as my base. Why? I've tried the half-moon thing in the past, and every time I try it all at one go, I end up pulling off base coat. This was a stress-free way to be sure that my base coat was dry. Here are the layers for my base:
2 Coats Beauty Secrets Ridge Filler
3 Coats Bongo Catching Kisses
1 Coat Borghese Clear Coat
1 Coat Seche Vite
 |
| Catching Kisses by Bongo |
Step 2
Anchor one point of the star on your skin, and firmly press the star onto your nail. The point anchored on your skin will make for easy removal with tweezers once you're finished painting. Double-check your stickers for any gaps. If your stickers aren't firmly attached to the nail, your lines (and polish) may blur.
 |
| Foil Star Stickers |
 |
| Stars Upon Thars! |
Step 3
Paint your nails! (again.)
 |
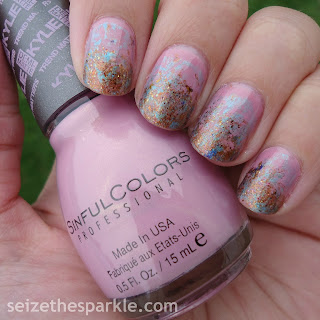
| Bongo Catching Kisses Staricure |
 |
| Staricure (OPI Bubble Bath) |
 |
| Staricure (Nails Inc. Old Vic) |
 |
| Staricure MACRO |
Polishes Used:
Base Polish (see above)
3 Coats OPI Bubble Bath (star outline)
2 Coats L'Oreal Lilac Coolers (star outline)
1 Coat Nails Inc. Old Vic
1 Coat Borghese Clear Coat
1 Coat Seche Vite
Is it really that simple? Yes and No. Like I said above, I highly recommend starting with day-old polish on your nails. It takes a lot of waiting time and stress away from the manicure. Part of my problem with any type of stencil manicure is that I'm horrible at judging when my nails are fully dry. That's why I paint my nails right before I go to bed. A coat of Seche Vite or Good to Go sets them up nicely that I can't ding them, and I wake up with perfectly dried nails 97% of the time*.
I don't recommend using 5 coats on top of the stickers. I think I would max out at 2 or 3 next time. I had a pretty clear idea of the look I wanted, and it called for a lighter shade over a darker one. To achieve that, I had to use Bubble Bath to bring Catching Kisses down to a point where I could layer something over it and have it turn the shade I wanted.
I took my time on this manicure, and it shows. And not in the greatest of ways. My stars have a bit of an edge to the outline because the polish started drying before I removed the stickers. I was going to pass on the layer of clear polish after Old Vic, but I was hoping it would help smooth off this edge. It smoothed it out well enough, but I was envisioning a more seamless look. I think that will come with a few more attempts.
I'm really happy with how this manicure turned out. It may not look exactly how I imagined, but it's a fun and simple way to amp up your nails. I kept my star stickers uniform, but next time, I might switch them around from nail to nail, or just use a couple for accent nails.
 |
| Staricure (Bongo Catching Kisses) |
 |
| Staricure (L'Oreal Lilac Coolers) |
Which do you prefer... A half-moon manicure, or a star manicure... Or are they both out of this world?!? (I'm cheesy and I know it.)
* 3% of the time, I'm a ninja in my sleep and I wake up with a dent or smudge. It's pretty rare, but it has happened.


Comments
Post a Comment