Nail Art: Distressed Nails
Have you heard of Distressed Nails? It's a look that Sarah from Chalkboard Nails came up with... She did two versions using metallics, then neons, before posting this awesome tutorial. So, this is my attempt to create a similar look...
Polishes Used:
1 Coat Beauty Secrets Ridge Filler
2 Coats OPI Black Onyx (base)
Sinful Colors Charmed (distress effect)
Spoiled Champagne Siren (distress effect)
OPI Black Onyx (distress effect)
2 Coats Borghese Clear Coat
1 Coat Seche Vite
Definitely filing this one under attempt #1. I can't quite file it as a failicure, because I actually like the way it turned out. Although, it did turn out differently than expected.
If you look at the distressed manicures posted over at Chalkboard Nails, they're definitely more precisely messy. I think I had waaaaay too much paint on my brush for each one of the distressed colors, resulting in my having to add more Black Onyx, then more Champagne Siren, more Charmed, more Black Onyx, rinse, repeat, etc... Yep. Why use less when you can use more? That's a thing, right? :)
My second mistake was picking out 2 glitter polishes for the distressed colors. Foil or metallic would've been better, but a creme finish seems ideal. I'll probably go with that next time.
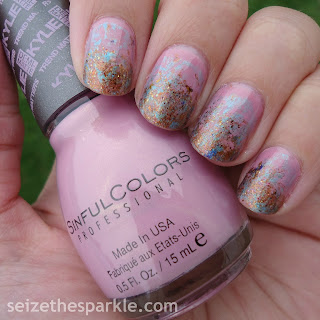
My third mistake? Placement. This came off looking like a sloppy gradient, because I focused most of the distressed polishes on the lower half of my nail, rather than on the WHOLE nail. Oops.
So, I guess I had something different in mind, but I really do like the way this turned out. I wish my pictures would've captured less of the shiny glitter, and more of the sparkly, swirly, granite countertop-like finish.
Have you tried Distressed Nails yet?
 |
| Sunlight |
 |
| Natural Light |
 |
| Natural Light |
 |
| Natural Light |
Polishes Used:
1 Coat Beauty Secrets Ridge Filler
2 Coats OPI Black Onyx (base)
Sinful Colors Charmed (distress effect)
Spoiled Champagne Siren (distress effect)
OPI Black Onyx (distress effect)
2 Coats Borghese Clear Coat
1 Coat Seche Vite
Definitely filing this one under attempt #1. I can't quite file it as a failicure, because I actually like the way it turned out. Although, it did turn out differently than expected.
If you look at the distressed manicures posted over at Chalkboard Nails, they're definitely more precisely messy. I think I had waaaaay too much paint on my brush for each one of the distressed colors, resulting in my having to add more Black Onyx, then more Champagne Siren, more Charmed, more Black Onyx, rinse, repeat, etc... Yep. Why use less when you can use more? That's a thing, right? :)
My second mistake was picking out 2 glitter polishes for the distressed colors. Foil or metallic would've been better, but a creme finish seems ideal. I'll probably go with that next time.
My third mistake? Placement. This came off looking like a sloppy gradient, because I focused most of the distressed polishes on the lower half of my nail, rather than on the WHOLE nail. Oops.
So, I guess I had something different in mind, but I really do like the way this turned out. I wish my pictures would've captured less of the shiny glitter, and more of the sparkly, swirly, granite countertop-like finish.
Have you tried Distressed Nails yet?

Comments
Post a Comment