Nail Art: Saturated Neon Striping Tape Manicure
I've mentioned many times how I'm not the best artist. Which is frustrating, because I love a lot of the nail art I see on other blogs, especially some of the free hand designs! They're ah-mazing!!! But, Renoir I'm nawt, so I typically stick to layerings and gradients, which still let me play around with color, minus my D- drawing skills. Every now and then, though, I get a little adventurous... I tried the Staricure, I tried Distressed Nails... so now, after owning a roll of striping tape for almost 6 months without even opening it, I ripped into the package last night, and set to work...


Polishes Used:
Orly Neon Watercolor Manicure (base)
Striping Tape
2 Coats Orly Saturated
2 Coats Sinful Colors Clear Coat
1 Coat Seche Vite
So, while I was painting my Watercolor Manicure the other day, I was planning on attempting this one once my "base" was good and dry. What better way than to wear it for a day? Honestly, this is a good method when using any kind of tape or sticker for a mani! You're practically guaranteed not to pull your basecoat off right along with the sticker!!! (Trust me, I've done that!)
Orly Saturated was the only member of my Orly Baked mini-mani set that didn't join the watercolor party... totally for a good reason, though! I wanted to do some sort of layering that incorporated all of the colors. Originally, when I purchased the set, I thought I would do a gradient of some sort. But, I've been wanting to try a striping mani for a while now, so... Bonjour, Saturated Neon!
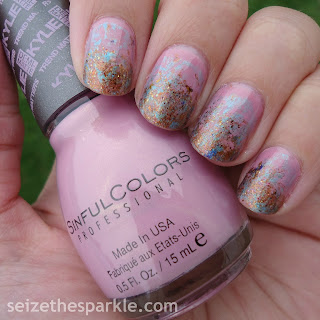
I mentioned this was my first time working with striping tape, right? It actually was really easy to use, it just took a little time and patience. Other than the two triangles, I didn't have a particular design in mind. I tried to be as random as possible while applying the striping tape, but I did actively try to make each nail different! I applied the striping tape to all my nails, then went back and trimmed some of the edges. After firmly pushing down the tape onto each nail one final time, I brushed on 2 coats of Orly Saturated, removing the tape immediately after applying the 2nd coat.
Then... I waited. (lalala...)
After about 5 minutes, I painted on 2 coats of clear, and a final coat of Seche Vite to set everything. For my first attempt at this type of nail art, I was really happy with how it turned out. Yes... my triangles got a little wonky, but they both got wonky, so it looks like it was planned, right? (Right!) Other than that, the pointer on my right hand is the only one that got a little polish underneath the striping tape, but it didn't turn out too badly.
So, what would I do differently next time? I think I would stripe and paint one hand at a time. I'm pretty sure that would help quite a bit. It was hard to paint and take the tape off my nails with tape on my fingers, all the while trying not to smudge anything. Also, I totally forgot about using tweezers to help remove the tape. Oops.
Like I said, I'm really happy with how this turned out. The only question I have now, is do I leave it on for more than one day? Or is it time to move on to the next one? What do you think?!? (...and please keep in mind, Pretty Little Liars is on tonight!)
-S
Polishes Used:
Orly Neon Watercolor Manicure (base)
Striping Tape
2 Coats Orly Saturated
2 Coats Sinful Colors Clear Coat
1 Coat Seche Vite
So, while I was painting my Watercolor Manicure the other day, I was planning on attempting this one once my "base" was good and dry. What better way than to wear it for a day? Honestly, this is a good method when using any kind of tape or sticker for a mani! You're practically guaranteed not to pull your basecoat off right along with the sticker!!! (Trust me, I've done that!)
Orly Saturated was the only member of my Orly Baked mini-mani set that didn't join the watercolor party... totally for a good reason, though! I wanted to do some sort of layering that incorporated all of the colors. Originally, when I purchased the set, I thought I would do a gradient of some sort. But, I've been wanting to try a striping mani for a while now, so... Bonjour, Saturated Neon!
I mentioned this was my first time working with striping tape, right? It actually was really easy to use, it just took a little time and patience. Other than the two triangles, I didn't have a particular design in mind. I tried to be as random as possible while applying the striping tape, but I did actively try to make each nail different! I applied the striping tape to all my nails, then went back and trimmed some of the edges. After firmly pushing down the tape onto each nail one final time, I brushed on 2 coats of Orly Saturated, removing the tape immediately after applying the 2nd coat.
Then... I waited. (lalala...)
After about 5 minutes, I painted on 2 coats of clear, and a final coat of Seche Vite to set everything. For my first attempt at this type of nail art, I was really happy with how it turned out. Yes... my triangles got a little wonky, but they both got wonky, so it looks like it was planned, right? (Right!) Other than that, the pointer on my right hand is the only one that got a little polish underneath the striping tape, but it didn't turn out too badly.
So, what would I do differently next time? I think I would stripe and paint one hand at a time. I'm pretty sure that would help quite a bit. It was hard to paint and take the tape off my nails with tape on my fingers, all the while trying not to smudge anything. Also, I totally forgot about using tweezers to help remove the tape. Oops.
Like I said, I'm really happy with how this turned out. The only question I have now, is do I leave it on for more than one day? Or is it time to move on to the next one? What do you think?!? (...and please keep in mind, Pretty Little Liars is on tonight!)
-S

This is definitely a keeper :) Love how it turned out!
ReplyDeleteThanks!
ReplyDelete