Today's nails were inspired by
this awesome manicure. As far as nail art goes... I'm still wiggling my toes in the shallow end of the pool and wearing swimmies! I'm an artsy person... but I'm a bad artist. Like,
really bad. Even my stick people are laughable! Talent aside, I'd like to wade a little deeper, and I have all the equipment I need... The excuses stop here!
Now, on to the pictures...
 |
| Natural Light |
 |
| Sunlight |
 |
| Natural Light |
 |
| Artificial Light |
 |
| Natural Light |
 |
| Blurry Macro |
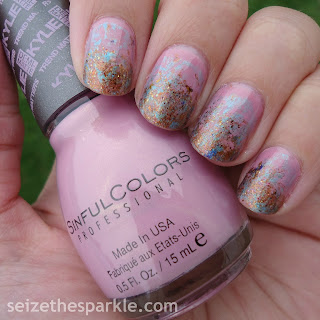
I'm really happy with how this mani turned out. If nail art is your downfall, give Michelle's
tutorial a try. I didn't have any of the colors she used for her manicure, so I used the closest colors I had in my stash. This resulted in a slightly different look than the one Michelle achieved... but still super sparkly and pretty! I can't wait to try this with different combinations of colors!!!
Polishes Used:
1 Coat Beauty Secrets Ridge Filler
2 Coats NOPI Khloe Had a Little Lam-Lam
1 Coat Pure Ice Heartbreaker
3 Coats Zoya Katherine (for the gradient effect)
1 Coat OPI Top Coat
1 Coat Seche Vite
I fell in love with the look of Michelle's layering as soon as I saw it. This is a great example of how to make a layering your own, and end up with a totally gorgeous and unique result! There are a lot of colors that I never think to put together, let alone layer. I would never have thought to pair Katherine with Khloe... A grape jelly with a dark teal creme? And they look totally awesome together! I love how this manicure looks different depending on the light, too. Inside, it looks like a black gradient. In the shade, it appears to be a blackened purple. Then in sunlight, you can really see the purple and the sparkle! So pretty!!!
Have you tried a gradient manicure yet?!?

Comments
Post a Comment